
📸 How to Screenshot on Chromebook (With Photos)
Chromebooks make capturing your screen quick and easy — whether you’re saving notes, sharing an error message, or showing someone what’s on your display.
Here’s a complete, easy-to-follow guide on how to take a screenshot on a Chromebook, with visuals and pro tips.
🧭 1. How to Take a Full-Screen Screenshot
Shortcut:
Press Ctrl + Show Windows (⧉)
Steps:
-
Hold down the Ctrl key.
-
Tap the Show Windows key (it looks like a rectangle with two lines on the right, usually above the number 6).
-
Your screen will briefly dim — that means the screenshot has been captured.
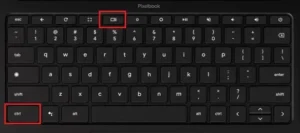
Your screenshot will automatically be saved in the Downloads folder and appear in the bottom-right corner of your screen for quick access.
🧩 2. How to Screenshot a Specific Area
Shortcut:
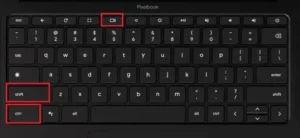
Press Ctrl + Shift + Show Windows (⧉)
Steps:
-
Hold Ctrl + Shift, then press Show Windows.
-
The cursor will turn into a crosshair.
-
Click and drag to select the area you want to capture.
-
Release to take the screenshot.
🪟 3. How to Screenshot a Single Window
Steps:
-
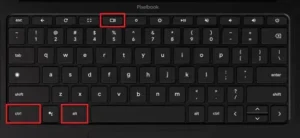
Press Ctrl + Alt + Show Windows (⧉).
-
Click on the window you want to capture.
-
The Chromebook will take a screenshot of that window only.
🧠 4. How to Take Screenshots Using the Screen Capture Tool
If you prefer using your mouse or touchscreen:
-
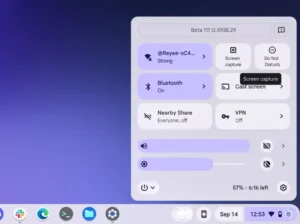
Click the Clock in the bottom-right corner.
-
Select the Screen Capture icon (a small camera).
-
Choose between Screenshot or Screen Record, then select:
-
Full Screen
-
Partial Area
-
Window
-
💾 5. Where to Find Your Screenshots
All screenshots are saved automatically to your Downloads folder.
To find them:
-
Open the Files app.
-
Go to the Downloads section on the left panel.
You can also access recent screenshots by clicking the notification thumbnail that appears after taking one.
✏️ 6. How to Edit or Annotate a Screenshot
After you take a screenshot:
-
Open it from the preview notification or Files app.
-
Click the Edit (✎) icon.
-
You can crop, rotate, draw, or highlight your screenshot before saving.
⚙️ 7. Pro Tips for Chromebook Screenshots
-
Press Ctrl + P to print or convert your screenshot to PDF.
-
Press Ctrl + Z to undo if you make a mistake while editing.
-
Use Google Drive to back up screenshots automatically.
-
You can also say, “Hey Google, take a screenshot” if Google Assistant is enabled.
🧾 Common Questions (FAQ)
Q1: Where do Chromebook screenshots go?
A: They’re saved in the Downloads folder by default.
Q2: Can I change the screenshot location?
A: Yes. Open the Screen Capture tool → Gear icon → Select Save to → Choose a new folder.
Q3: How to take a screenshot on Chromebook without the keyboard?
A: Use the on-screen Screen Capture tool from the Quick Settings menu.
Leave a Reply